FINAL CUT PRO - Getting Started
Final Cut Pro can be daunting when you first use it. We will do our best to guide you through, but a very very good resource which you should also use is the Final Cut Pro manual which is available online. I have been using this program for years and I still refer to the manual as my bible!!
VIDEO FILE FORMATS
Video Format Basics - In Australia we use the PAL standard, at 25 frames per second. The aspect ratio of a video frame is width with respect to height, so Standard Definition video has an aspect ration of 4:3, while High Definition is 16:9.
Before you can begin editing your video in FCP you need to have an understanding of how your video is compressed and its file format, as you will need to set FCP to work with the correct format, so that it runs as efficiently as possible, and output the best quality video possible.
The video file is made up of the container format and the codec.
1. Container Format: identified by the file extension, for example .mov (quicktime movie), .mp4 (mpeg4) or .avi (AVI).
2. Codec: the compression method, for example H.264, DV, AVCHD, or M-JPEG (Motion JPEG). [Apple ProRes 422 is also another codec great for editing HD video]
1. Container Format: identified by the file extension, for example .mov (quicktime movie), .mp4 (mpeg4) or .avi (AVI).
2. Codec: the compression method, for example H.264, DV, AVCHD, or M-JPEG (Motion JPEG). [Apple ProRes 422 is also another codec great for editing HD video]
To find out the format and compression of your video > Command click > Get Info. The info your looking for is under General: Kind, and More Info: Codec.
VIDEO FILE FORMATS IN FINAL CUT PRO
It is best practice to change your video clip format to suit FCP’s settings and/ change FCP’s sequence settings to suit your video clip format. (Thankfully, the latest version of FCP will prompt you to change the sequence settings to match your clip settings, making this next step almost redundant.)
Opened FCP > New Project.
To change your sequence setting to match your clips, in the menu bar > Sequence > Settings (the short cut is Command 0). Change the values in the general window.
(You shouldn’t need to do this in the version of FCP we are using, as mentioned above, as when you drag your clips into the timeline it will prompt to change the settings of the sequence in accordance with your clips.)
If you are working with HD video (or H.264 file format), I strongly recommend you convert your video files into the Apple ProRes 422 codec in a program like Compressor. (SEE NEXT BLOG POST TUTORIAL ON COMPRESSING HD VIDEO AND USING COMPRESSOR)
Changing your sequence settings to match your clips works well and is less labour intensive if all your clips are the same format, and if it is a format that FCP edits and handles well. For example, FCP edits DV well, but has trouble with H.264.
If you have multiple video clips in different video file formats or in a format FCP doesn’t like, you should convert them all to standard format to edit. Your destination for the footage, for example DVD or YouTube, will also determine the best choice, as will the type of footage you have.
If you have Standard Definition (SD) footage and are planning to output to DVD, then DV is a good choice. Choose DV PAL Anamorphic if you have anamorphic (widescreen) SD footage.
INITIAL FCP SET UP
You may be required to reset your scratch disk, this is a particularly important step if you are using an external hard drive. This is the where FCP will save your work, and it should be where you keep you clips. A USB stick does not work the same way as an exHD in this case.
Menu bar > Final Cut Pro > System Settings.
Click SET and locate your Hard Drive, you can even create a new folder to save all of your FCP documents in.
Click CLEAR on Mac HD (the computer's hard drive), so that it only saves to your hard drive.
Click OK.
EXPLORING THE FCP WORKSPACE
Each of the windows can be opened or closed individually. If you accidentally close the browser for example, you can reopen it by menu bar > window > browser. If you want to hide all of the windows: menu bar > final cut pro > hide final cut pro (the short cut is command H).
IMPORTING CLIPS
Make sure you have your video clips, still images and sound/music saved onto your hard drive.
File > Import > Files.
Locate your clips. You can select more than one by holding down the shift key.
Your files (clips, images or sounds) will appear in the bin in the browser window.
If you double click on a clip/image/sound it will open in the Viewer window, where you can watch/listen.
EDITING CLIPS
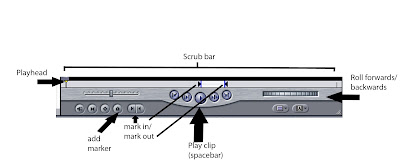
You can mark in where you want your clip to begin and out where you want it to end, then click and drag the clip from the viewer down to the timeline.
You can also drag and drop clips straight from your bin into the timeline.
The beauty of FCP is that it is a non-linear editing program, which means you can work on multiple scenes/sequences at once, then arrange them in order later. To open another sequence File > New > Sequence.
TIMELINE
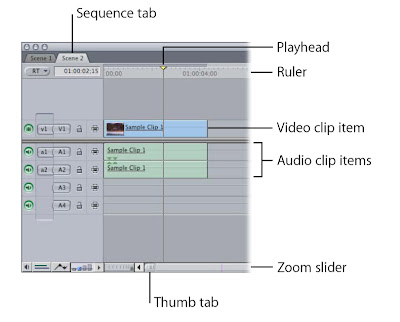
You can have layers of clips, like in photoshop, just drag and drop the second clip above the first (not directly on top, but just above to create a v2 (video 2) in the timeline. The top clip will be the only one visible until you change the composite mode or resize or cut the clip (which we will cover soon).
You can drag the clips to any position within the timeline. If you have linked selection on the audio will move with the video (and vice versa), if it is off, you can separate the video from the audio (including deleting it from the timeline).
Having snapping on means when you move clips around it will snap to the edit, marker or playhead it is closest to.
TOOLS
The 2 most common tools you will use are the selection tool and the razor blade tool. The selection tool has the same function as in all of the other programs we have been using thus far.
The razor blade tool is used to cut your clips for editing. It allows you to cut unwanted footage from your timeline.
You can cut a clip anywhere in your timeline. Make 2 cuts and delete in between (select section to be deleted with the selection tool and hit delete on the keyboard). You can then simply drag the clip to meet up with the previous edit.


Razor Blade All: Cuts all clip items on all tracks at the point where you click in the Timeline.


If you delete too much of a clip, you can simply click on the edge of the clip and drag it to where you want the clip to end. The beauty of non-destructive editing!! As you move your arrow over a clip it changes from an arrow (around the center of the clip) to a Resize pointer (at either the beginning or the end of the clip).


Another interesting and easy effect for your edits
In the bottom left hand corner of the window you will see this little tool.
You can mark in where you want your clip to begin and out where you want it to end, then click and drag the clip from the viewer down to the timeline.
You can also drag and drop clips straight from your bin into the timeline.
The beauty of FCP is that it is a non-linear editing program, which means you can work on multiple scenes/sequences at once, then arrange them in order later. To open another sequence File > New > Sequence.
TIMELINE
You can have layers of clips, like in photoshop, just drag and drop the second clip above the first (not directly on top, but just above to create a v2 (video 2) in the timeline. The top clip will be the only one visible until you change the composite mode or resize or cut the clip (which we will cover soon).
You can drag the clips to any position within the timeline. If you have linked selection on the audio will move with the video (and vice versa), if it is off, you can separate the video from the audio (including deleting it from the timeline).
Having snapping on means when you move clips around it will snap to the edit, marker or playhead it is closest to.
TOOLS
The 2 most common tools you will use are the selection tool and the razor blade tool. The selection tool has the same function as in all of the other programs we have been using thus far.
The razor blade tool is used to cut your clips for editing. It allows you to cut unwanted footage from your timeline.
You can cut a clip anywhere in your timeline. Make 2 cuts and delete in between (select section to be deleted with the selection tool and hit delete on the keyboard). You can then simply drag the clip to meet up with the previous edit.
Razor Blade All: Cuts all clip items on all tracks at the point where you click in the Timeline.
Another interesting and easy effect for your edits
In the bottom left hand corner of the window you will see this little tool.
If you click on it a white line will appear in your timeline.
Then select the pen tool.
You can then add keyframes to the white line with the pen tool.
If you drag a keyframe down to the bottom of the timeline, it reduces the opacity of the video.
This is really useful to fade in and out, and also to lay one video over another.


No comments:
Post a Comment